Showing posts with label staff. Show all posts

Monday, July 7, 2014

[Tutorial] Super-quick Harley Quinn Mallet

Some time ago I volunteered to join in a costume appearance for fundraising Typhoon Haiyan funds  for charity. I had somehow agreed to costume as Harley Quinn (don't ask, I'm still embarrassed ><) and decided to build her iconic mallet up quick just in case they didn't have any props or other costumey stuff available as it was an extremely short notice thing.

Didn't help that I was busy with other things and ridiculously broke, but it's good to have stock of random supplies in the house...you never know when they'll come in handy!

All in total, the project cost me maybe RM15.

At any rate, this is what I used:

Material:
1 pc 1mm leftoever pvc foam board (something like sintra, but not as expensive)
1 recycled plastic pipe from an older project
4 sets of nuts and bolts
2 appropriately shaped bukkits
Duct tape
Tons of wide masking tape (you'll need a minimum of 2-3 rolls)
Red and black acrylic paint
Matte transparent spraypaint for sealing

Tools:

Soldering iron (because I prefer to melt holes rather than drill them)
Hot glue gun
Screwdriver
Brushes
Markers
Cutter knife (or an x-acto if you have one)
Pliers (optional)

----
I started out by using one of the buckets to trace out two circles about as wide as the mouths of the buckets so form the 'lid' of the bucket. I used this bit of extra pvc foam board I had lying around but if you want something cheaper or lighter you could use mounting board or cardboard even. Cut out the two shapes and put them aside.

Next, I cut the edges off the buckets' mouth using a knife and a pair of pliers to help me yank off the more stubborn bits of plastic. I made sure to leave a little bit behind so it's easier to stick the cut shapes to the buckets later down the road. You can omit this step if your buckets don't have a wide 'lip'.Sandpaper it down for safety.
Do the back too!
Careful with the amount of force you use, it's better to twist the plastic off or cut it rather than yank, that can crack the plastic
After that I took the old pipe from an older project (it was a staff) and cut about a foot off to make it short enough for Harley's Mallet. Depending on your construction a PVC pipe might be too soft for use in the long run so I suggest that for longevity you use a wooden stick instead if you can.
I also had to peel off the epoxy clay from the top
I lined up both buckets together and marked where I would put down holes for bolts to hold them together. Note I accidentally broke one of the buckets trying to nail holes with a hammer =\ so I resorted to using a soldering iron for better effect.
accidents happen :(
I also used it to cut out some space to insert the PVC pipe to complete construction. Just do it in a ventilated area if you're melting plastic!
Don't forget to cut some space for your stick
When you're happy with the placement of things, screw in your bolts and pop out your hot glue gun, glue in the pipe with liberal amounts of hot glue as well as around the base of the buckets on the outside for good measure.

Don't worry too much if it's messy, it's likely to be covered by tape in one of the next steps. Duct tape down the stick from the inside for some extra durability.

At this stage you can glue on your bucket 'lids' or do it after you finish your tape. It makes no real difference.
This is roughly what it would look like at this point
Don't forget to cut off any access so the lids are flush with the bucket
Take your tape and tape down your buckets lengthwise. You will have to keep doing this until the entire bucket is coated and it's shape becomes more like that of a mallet, not two buckets glued together hodgepodge.

You can put as many layers as you like, though more is better. The paper tape also helps make it possible to be painted later. Don't forget to press it down till it's snug.

When you're happy with how thick it is, you can then get to painting. I had to do mine indoors so I laid a load of newspaper on the floor and used some plastic bags to protect the chair I was using to prop up the mallet.

The design I used isn't 100% in line with any particular Harley Quinn mallet I've seen (also because I was short of time anyway) but feel free to use any design you see fit. Woman's had a lot of different mallets.

I painted I think maybe 4 layers of red and black. The masking tape will suck up a fair bit of paint on it's own as well, so use liberal amounts but be sure to let each layer of paint dry before smacking on the next. Clumpy paint takes ages to dry.

After it dries completely (it will take awhile, trust me) I hit it with a coat of matte transparent spray paint to seal it up and we were done!
I'm fairly proud of the results considering it was done in a very short amount of time for a ghetto Harley. Hope this tutorial was useful!

Tuesday, April 2, 2013

Wizard Staff Repair!

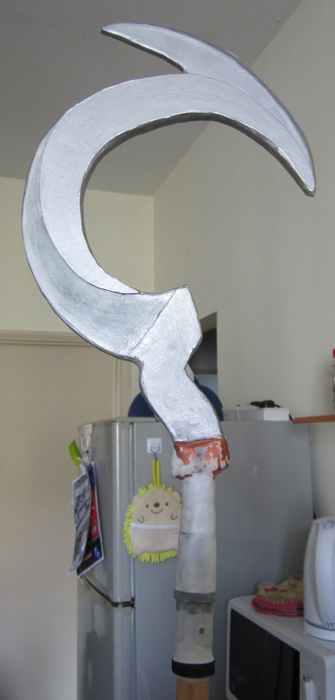
About two years ago I built a simple custom wizard staff for one of my Ragnarok Online cosplaying buds.The first build wasn't all that great, it was a real last minute thing considering we had less than a month to do it from scratch and since said person was on their finals or something (I think) I had to do most of the build myself.

It was primarily composed of a PVC pipe, a few layers of strategically placed foam and mounting board as well as a generous helping of epoxy clay to strengthen it up near the base.The build had inherent problems like the head drooped to one side a little and it tended to scarily flop about when handled roughly; but thankfully it survived that convention just fine.

As time went by the already haphazard build was getting slightly damaged on the head section and he also requested that I make the staff collapsible when I get to fixing it.
Basically what needed to be replaced was the staff itself, since the original one was a plastic pipe it had bent out of shape over the course of the year in storage, so we cut it off and set about making a new connector for the head of the staff.

First we went to the hardware store to get a new handle for the staff. This part was easy because the store already had ready made broom handles that were already sanded so we went with one of those. Then we got ourselves a pair of plastic pipe connectors that already fit the stick (because again, short on time and convenience) so the top can be unscrewed for easy transport and storage. 

The new connectors fit very nicely but I had issues with how it looked. The staff's general look was fairly organic and I didn't like how angular the connectors were, so we set to work again. I also decided to reinforce the head itself with a layer of epoxy to strengthen it and stop it from wobbling so much, and gave what was left of the old connection a sanding.
After nailing down the respective connectors to the two separate pieces (one for the head and another for the staff itself) I cut a piece of thick leftover EVA foam and glued it to the bottom of the lower connector to provide some shape. When it dried I slapped on some epoxy clay and water smoothed it until I was happy with the distribution. I let it dry for a few hours till it was safe to touch before I got to the plastic connections themselves. 

Being fairly angular they stuck out a fair bit on the staff, and using a rotary tool I had borrowed from another builder friend I shaved most of the angles off both connectors for a more organic feel
The top and the bottom again were given a wet sanding and another couple of layers of epoxy clay to cover the exposed sections and generally make it smoother. This part was quite messy because dealing with wet clay is already messy as hell, combine it with having to do it with a five-plus foot long stick didn't make it any easier.

I don't have an intermediate photo of where we finished it up and painted it all but the result was pretty good. We used a fair helping of Pewter Rub N Buff (polished later) on the handle and I touched up the head with it too; to blend in  the newly epoxy hardened bits. The base of the staff was given two coats of coppery acrylic paint. When that was done we sealed the whole lot with a sealer to keep all the hard work from getting damaged. Overall the repair process took about a week of time, and the painting/drying on it's own took an extra three-ish days.

Both of us were quite satisfied that it was now sturdier and no longer had to bang the roof of my car when he was hitching a ride with me, but its a pity that the paint was so reflective it showed up as white in almost every photo.
If I were to bother the design anymore after this point it would likely be to add a bit of decoration to the entire staff to make it feel more mystical or something, but that's likely gonna be another fix for another year.